
Sidemount Scuba
When and why I became a believer in sidemount scuba.
If you are thinking of making the transition to sidemount scuba, read on…
Additional Reading: Check out my review of the OMS SideStream Sidemount System.
It’s been several years since I first started seeing divers using sidemount scuba. At the time, I really didn’t get it. From the beginning, I understood the benefits of sidemount in small caves, but I really wasn’t sold on the idea for open water.
Let me say at the onset that I am not a full-time sidemount convert. For big dives with a lot of different deco gases, I find back-mounted doubles to be more manageable. (Update: As of 2024, I hardly ever dive doubles anymore. For the last several years, I have been focused on rebreather diving and underwater imaging for clients. Big, deep, expensive open circuit dives just aren’t a priority unless I’m teaching.) Think about it. Bottom gas, plus 3 deco gases and a deco/travel gas is a lot to carry. For the types of dives we do in this area, staging cylinders really isn’t an option. So, we’re carrying all of those throughout the dive.
Moving two of those from the back to the front can create quite a cluster. People do it. Good for them.
But, not all of our dives are big dives, and the cost of helium makes open circuit deep diving less attractive to me all the time. In my opinion, the sweet spot for open circuit scuba is air diving depths. So, why get into sidemount at all?
Why dive sidemount?
Technical sidemount scuba is a great option for small boats.
My interest in sidemount scuba began for one reason. Small boats and doubles don’t play well together. The size and weight of the gear makes loading and transport a nightmare, and getting in and out of the water miserable, or even impossible in doubles.
Gearing up in the water is an option, but it isn’t easy in doubles. Depending on your harness configuration, getting them off in the water can be a real problem. And, even if you do, pulling those big doubles back into the boat sucks for everybody–and the boat.
Sidemount, on the other hand, is more or less like clipping on deco bottles. Doing that in the water is a piece of cake. At the end of the dive, pulling individual cylinders back into the boat is easy too.
Sidemount scuba makes technical diving possible just about anywhere.
A lot of technical divers are forced to stay in what I like to call “the kiddie pool” when traveling. Even popular dive destinations like Hawaii have very limited options for acquiring doubles. For most, that means everything beyond 130′ is off limits, and sticking to the NDL mandatory.
However, every dive destination has AL80s, and most carry EANx32 at least. 160 cubic feet of air using EANx32 for deco opens up many more dive profile options. For warm water, all you need is a minimalist sidemount harness and wing, plus lightweight rigging and a couple extra regulators.
Sidemount scuba is easy on your body.
Recently, I’ve been coping with a bit of an arthritis issue. How I’ve managed it is a topic for another day, but being able to carry cylinders to the water individually is pretty great to minimize pain.
I have friends with back problems. Sidemount for them means never having to gear up out of the water. For these divers, recreational sidemount is the difference between diving comfortably and not diving at all.
Sidemount Scuba Equipment
My unorthodox approach to sidemount diving gear.
I don’t really recommend starting out in sidemount diving the way I did. As a technical diver, I use pretty much the same backplate and harness configuration for everything. I have several plates, but mostly for different weights (aluminum through 6mm stainless), all rigged the same.
Before I go on, let me inject that I had been doing a lot of deep, deco dives with buddies that are using sidemount, and of them are sidemount instructors. My progression wasn’t blind experimentation. I was intimately familiar with their gear and worked out in detail what I was doing and why. I had the benefit of their expertise as well as hands-on experience with the proper equipment.
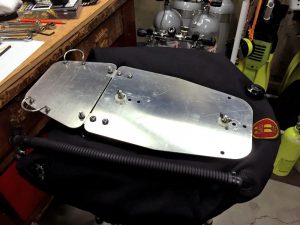
Anyway, it stood to reason that if I could keep my wing flat and come up with a way to clip my sidemount cylinders closer to butt level, I might have a good starting point.
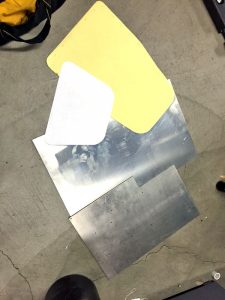
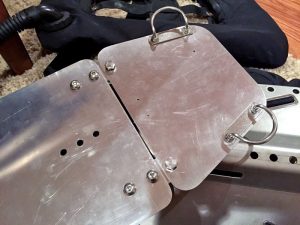
I handled that with a trip to my brother’s machine shop. I made a pattern by tracing one of my backplates, and cut the shape out of 1/8 inch aluminum. Next, I drilled holes on 11 inch centers. The idea was that I could sandwich a wing between my backplate and this new top plate. The top would then keep the wing from folding in half when air is added to it.
Next, I cut another aluminum plate into a shape that looked “butt-platey” and drilled it for rails. My original plan was to let it swing on a couple stainless quick links, but one of my buddies thought it looked to floppy. So, I used rigid brackets instead.
The whole thing went together easily, so the first chance I had it was off to the pool.
My first sidemount scuba test
I didn’t have high expectations, since I was using a bunch of homemade crap instead of bona fide sidemount gear. Not surprisingly, I was trimmed very head up. I came equipped with a pile of clip weights to figure out what I needed to move where.
BTW, there are very few buoyancy and trim problems adding weight will fix. Moving weight wasn’t really an option at this point, so I just did my best to estimate the ideal distribution.
What I learned was getting all the hoses sorted out is a pain, steel 3300psi 72’s are unwieldy in the water, and that I would need to distribute weight much higher and get buoyancy down toward my hips.
Sidemount scuba tank position
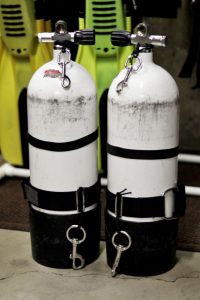
Since most of the weight I had was in those heavy 72’s, my first step was to move them much higher. I did this by changing the length of what I was using for a choker (shorter), and shortening the line attached to dog clip at the butt end. This pulled everything up and in.
I also moved my plate up one hole, which squeezed a little bit of buoyancy out of the top of the wing.
Once back in the water, my trim was perfect. Really perfect. So, I spent the next 45 minutes hovering and finning around the pool in various ways. I’d clip tanks on and off, push them out in front of me… everything I could remember from the instructor guide I borrowed.
My first open water sidemount dive
Having sorted out my hose routing, tank position and basic sidemount diving skills in the pool, I was eager to do a sidemount dive in open water. I met a couple of my instructor/tech diving buddies at Meeks Bay, Lake Tahoe where they had planned a 175′ deco dive on sidemount.
My idea was to tool around in shallow water to make sure my trim and weighting was right. Then, if everything was good, I’d follow them down the slope for a bit and just get comfortable doing sidemount in a drysuit.
Once in the water, my trim was again perfect, and my gear placement felt great. We did a few gas sharing drills, shutdowns and all the skills required for the PADI Sidemount Diver course. Next, we headed down the slope for what turned out to be my favorite dive of the season.
For the record, I kept within recreational limits. I had done the appropriate deco and gas planning, so I was more than tempted to just go for it. I personally think discipline is a critical dive skill, so the deep dive would have to wait.
Gaining Experience in Sidemount Scuba
After that, I did about 30 dives in my homemade sidemount rig. Most of those were in Tahoe, and a lot in Monterey, CA. By my 10th or 15th dive, I had my system dialed in and mostly stopped making adjustments. By 20, I felt as comfortable sidemount diving as I do in back mount.
For the most part, my goals haven’t changed. Sidemount scuba is a means for getting gas volume and redundancy to places where doubles are impractical. At the same time, I was really enjoying learning new skills and going through the process of becoming an accomplished sidemount diver.
Changes to my equipment
By then, I had become a true student of sidemount diving. I read everything I could, and one thing that stood out was my plate arrangement wasn’t appropriate in every environment. In caves, hard plates are frowned upon because you run the risk of ratcheting yourself into a crack. Since the plates won’t bend, extraction may not be possible.
Aside from that, the rigid plates really weren’t very handy for gearing up–especially on boats. At some point, I knew I’d go with something different for sidemount diving in cold water with a drysuit. That would have to wait, though, because I had a Kona trip coming up.
Sidemount Goal #2: Technical Dives Traveling
I wasn’t about to pack all my homemade sidemount crap to dive in Hawaii. I wanted to go as minimalist as possible. I was aware of sidemount systems like the Razor and xDeep, and even considered an MSR bladder. I ruled out MSR because there really isn’t a good way to attach a standard inflator.
I like the other systems, but they require specialized plates, and I didn’t have those. So, I set out to see what I could do with what I had in my basement. Essentially, that meant lots of 2″ webbing and assorted slides and d-rings.
The challenge would prove to be at the shoulder and lower back attachment points, which is where Razor uses those specialized plates. The argument for that is it makes it possible to use a single length of webbing for the entire harness. It’s hard to be more minimalist than that. Being a single length of webbing, it is thought to be very strong.
Personally, I think the strength argument is moot. The webbing I use has a tensile strength of 5500 pounds You can break a human pelvis or rib cage with way less than 100 pounds of force. Enough said.
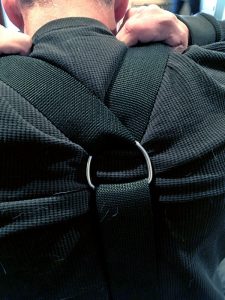
Given the parts I had, the shoulder strap end was easy. In much the same way as a backplate, I simply routed the strap up one side, through a d-ring and down the other. I used a short length of webbing to for a cross with a d-ring on each end, that I held in place with belt slides. The shoulder straps routed through the two d-rings similar to the routing with a backplate.
The result is an incredible light and compact sidemount harness. There’s a single buckle at the waste like any other harness, but since the transition points from where the waste strap becomes a shoulder strap isn’t fix into place, the harness provides a more custom fit. It’s also easy to adjust underwater.
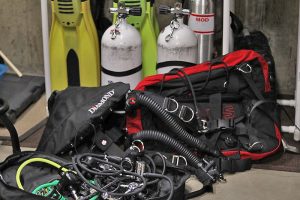
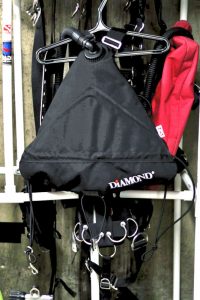
Selecting a Sidemount Wing
Ultimately, I chose the SubGravity Diamond Wing. Their promotional materials say it provides 18 pounds of lift, but the tag on the wing itself shows 17 pounds. Go figure.
I chose it primarily for the low center of buoyancy, and the way it attaches to the harness. At the top, there are tabs that thread into belt slides on the shoulder straps. This arrangement completely eliminates the need for a custom plate.
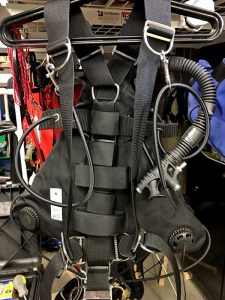
More detail of my first version of my sidemount travel harness.[/caption]Across the bottom, down the diver’s spine, there’s a series of narrow and wide velcro tabs that wrap around the harness to hold the center of the wing in place. The wide ones allow for the placement of trim pockets fairly high up the diver’s back, which is ideal. Together, these will hold 10 pounds, which is more than enough for my 5mm wetsuit in salt water.
The bottom and sides of the wing secure with bungees. I don’t love the way they run the side bungees around your waist, but I haven’t gotten around to changing it yet.
The tank bungees are a bit beefy in my opinion, but easy to change if I feel the need later. Outside of that, it’s close to perfect.
My minimalist instincts still make me want to experiment with an MSR bladder, so maybe that’ll be the topic of a future post.
Changes to my sidemount travel harness
One thing I never liked about my “travel sidemount” harness is the way I threaded together the lower waist crosspiece with the d-rings. It’s plenty secure, but requires a lot of parts and has a bailing wire/duck tape feel I don’t like. Also, using the small double d-ring works, but doesn’t provide much working space. The attachment point is too high up as well.

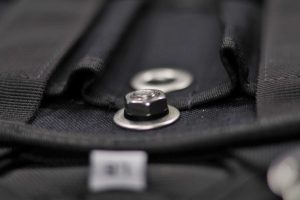
For version 2, I completely changed my approach. The waist loops now attach with a book screw. I used stiff webbing to fabricate a low profile butt plate. The rails are stainless u-bolts. I used a press break to bend them to 90 degrees just above the threads.
This is where I’m pretty sure I’ll get hate mail from my DIR friends. But, even with a few holes, the webbing strength is far greater than the human body can endure. Also, this butt plate has about the same amount of flex as the store-bought ones.
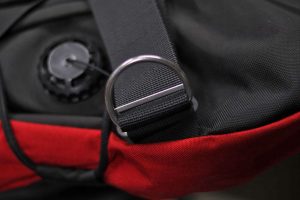
The only extraneous parts are the low profile d-rings at the ends. The idea is to have a lower attachment point for the tanks as they become more buoyant. In practice, it makes almost no difference and they’re harder to clip to.
The rest of the harness works exactly as before. It is super compact, ultra-light, comfortable and secure. It may be my own vanity, but I think it’s only a matter of time before manufacturers copy my minimalist butt plate.
Cold Water Sidemount Scuba
My warm water sidemount rig is near perfect, but I don’t get to dive warm water all that often. Even though it worked well for open water, I wanted a legitimate sidemount system with no backplate or makeshift components.
My requirements were that it handle very negative primary cylinders and be able to manage at least two deco bottles easily. I also didn’t want to have to thread lead weights where they don’t belong. In cold water, sidemount scuba requires enough lead to sink a of undergarment loft.
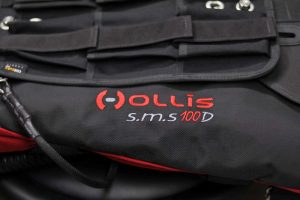
I settled on the Hollis SMS100 with dual bladders. I use their matching weight plate and place the heaviest weights at the top. I use double bladders for the same reason as I do with back mount doubles. Safety. (More hate mail from the DIR folks…)
Just as with back mount doubles, heavy steel sidemount cylinders mean you’ll be significantly negative at the start of a dive. In the event of a wing failure, regaining buoyancy control with your drysuit is dangerous, if not impossible. For me, having a backup makes sense.
Diving With the Hollis SMS100 Sidemount Scuba System
Someday, I’ll write a full review of the Hollis SMS100. For now, I’ll just point out a few things I like and a couple that I don’t.
First, it is very will built. It is easy to adjust and allows lots of different placement options for gear. As mentioned the weight plate came with book screws that really weren’t long enough to make me feel comfortable. I replaced them with 3/8 inch stainless steel bolts like I use for my doubles. Much better.
One thing I haven’t quite sorted out is placement of my deco cylinders. In sidemount, I usually don’t top clip the tank until I need it. That way, they trail out of the way, keeping my chest area clear throughout the dive. Clipping deco bottles to the rails tends to put tank valve and regulator first stage right between your legs. It doesn’t really affect swimming, but it is annoying. With two deco bottles, it’s twice as annoying.
To solve this, I added a waist d-ring. The problem with that is your access to that ring is between your primary cylinder and the BC bladder. That makes it very difficult to clip and unclip in dry gloves. I’m not sure what the right solution is. Usually, I just live with the valves between my legs, but I’ll come up with a better way to carry deco cylinders soon.
Fundamentally, the SMS100 is a great system. I see warm water divers criticize it for being bulky, but that’s like saying a screwdriver makes a sucky chisel. Of course it does. It’s a screwdriver.
All in all, the SMS100 is great. For me trim was perfect from my very first dive and it is configured well, even for deep, trimix dives. And, it looks better than my makeshift plate/wing system.
Transitioning to Sidemount: General Issues
For most divers, transitioning from single cylinder, recreational scuba will take some getting used to. Divers used to managing stage bottles generally have a smoother experience.
Diving sidemount, even achieving perfect trim, is not difficult. It’s getting equipment really dialed in that takes time. As a technical, drysuit diver, routing hoses cleanly can be a struggle.
My Cold Water Sidemount Scuba Setup
Sidemount Left Cylinder:
- SPG on a 4″ hose
- Regulator 2nd stage on a 36″ hose (90 degree adapter and a necklace)
- Primary LP inflator 16″ hose
- Drysuit inflator 16″ hose
Sidemount Right Cylinder:
- SPG on a 4″ hose
- Regulator 2nd stage on a 7′ long hose
- Primary LP inflator 16″ hose
As a general practice, technical divers route hoses inward and down. This keeps them out of the way of cylinder valves and the isolator bar. The sidemount version is that you run the most direct connections possible. That means using exact hose lengths and eliminating harsh bends.
Finding specific length hoses is simple enough, but regulator first stages don’t always cooperate. Ideally, we like to have left and right first stages that work like bookends. For that to work, the ports on both sides of the regulator must mirror each other. This is especially true for the high pressure port. If these exit the first stage at different angles, your pressure gauges will be in a different position on the right than it is on the left.
I fought this for a long time, and eventually just positioned my regulators in the same direction. Some sidemount scuba divers orient the valves with the handles pointed straight down, and the valve openings facing inward toward each other. I keep mine turned slightly inward. My regulator first stages are on the inside, and keeping the handles up a bit creates a cleaner profile in the water (more DIR hate mail).
My regulator second stages for sidemount scuba, are set up similarly to my technical diving back mount setup. My left regulator hose routes behind my and hangs on a necklace. I find my left regulator is more comfortable with a 90 degree adapter. I don’t use one on the long hose, however.
My right regulator has a 7′ long hose. I loop it once around my neck exactly the same a with doubles. Any extra hose is tucked under a retainer on the right cylinder. I don’t use a 90 degree adapter on the right.
There’s a bit of debate over the proper length of the long hose for sidemount scuba. Some divers make a valid argument for not using a long hose at all. I use 7′ because it’s what I have. 5′ would be just fine, I’m sure.
One argument for the standard hose is that, with sidemount, you can simply pass the cylinder, regulator and all. That’s fine for neutrally buoyant cylinders, for for heavy steel tanks, it’s bad idea. In that case, the cylinders themselves make up a lot of your weighting. Unclipping them isn’t much different than unbuckling and passing around lead weights. Drop one and you’ve got a major problem. Imagine doing that during an open water deco stop!
My Final Thoughts (for now) on Sidemount Scuba
At the time of this writing, I’ve done about 125 dives using sidemount scuba. Diving in sidemount definitely meets my small boat and travel goals. I also loved it while dealing with significant joint pain. For divers with back problems, sidemount can mean the difference between diving pain free and not diving at all.
For travel, I don’t even bother looking for rental doubles anymore. For extreme dives in remote locations, closed circuit is the best option by far. If boat diving, you really need to work it out with the operator. Most often, space is an issue, and technical sidemount scuba diving can be a liability issue. Also, it is just plain rude to make vacationing recreational divers wait while you run through your decompression schedule.
Personally, I plan trips that include sidemount scuba to places that are conducive to shore diving. Kona, Hawaii is big on my list, and I’ll be in Bonaire next month. For both, deco dives in the 150′ to 170′ range are easily doable from shore. Unless, it is specifically a technical diving boat, I personally stick to back mount recreational scuba like everyone else.
I’m definitely not a full time, sidemount scuba convert. But, when dive plans and circumstances warrant, sidemount can be heavenly. More and more, it is becoming my go to kit for technical dives to air depths, as well as relatively short and shallow trimix dives.
For anyone with similar goals or problems with the weight of back mount, diving with sidemount scuba opens opportunities that may not be possible otherwise. If you are thinking about getting into sidemount, or have different experiences, I’d love to hear from you.