
How to travel with your diving equipment.
Take everything you need without hassle and excess baggage fees.
Traveling light with scuba gear is an art. Reasons for keeping your dive travel gear as compact and lightweight are obvious. In my case, I’ve been doing a good bit of teaching and writing in and about dive locations worldwide (I know, hate me.). It is a major challenge to get the right gear, and enough of it to remote locations in one piece. Whether it is for a paying client, or your dream diving vacation, one missing piece can cost you, or even ruin a trip. 2GO Online Booking will help you to make the right choice.
In a few days, I’m leaving for an assignment to Roatan. [Update: I’m back now…] For this particular trip, I will be assembling all of the assets (photos, written copy, notes, interviews, testimonials…) required for a minimum, year-long web development and marketing project for a dive resort there. At the same time, I’ve been asked to write a magazine piece while on location. It is a great project, but requires a lot of gear, with only one chance to get it right.
I’ll need gear for both recreational and air-depth technical dives, plus underwater photo and video equipment. And, of course, I need to save room for a toothbrush and bug spray.
I’ll start with the basic list, then cover each item below. Selecting packable dive gear is important, but don’t just run out and buy a new BCD or other equipment just because it is supposedly made for travel.
Essentials for traveling light with scuba gear
- Choose the right dive gear
- Weigh everything and shave ounces
- Make the most out of carry on and personal item
- The best diving luggage, gear bag, etc.
- Packing for dive trips
- Knowing what to leave behind
Choosing the best dive gear for travel
For starters, don’t be influenced (much) by ads. When selecting dive equipment for travel, size and weight are primary concerns, but you must keep in mind appropriateness for the dives you’ll be doing. I’ll stick with warm water gear for now, since that accounts for most diving that includes air travel.
Buoyancy Control Device (BCD) or Buoyancy Compensator (BC) if you’ve been around a while
There are quite a few “travel BCs” to choose from–ScubaPro Light Hawk, Hollis Light Travel System (L.T.S), Aqualung Zuma, to name a few. Most are pretty good. A few are really good. But, if you dive in cold water near home, chances are your lightweight travel BCD will be inappropriate when you’re not on vacation.
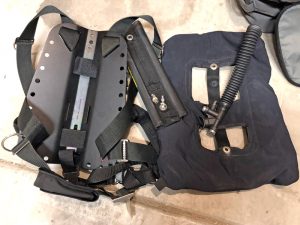
Personally, I don’t mind owning a little extra gear, but I take a different approach than most divers. I started using backplates long ago. It is really the only appropriate solution for carrying heavy doubles, but there advantages even for recreational divers–especially traveling divers. A backplate/wing setup won’t appeal to every diver, but it is definitely worth a look.
All BC/BCDs are made up of three fundamental elements: a harness, air cell or bladder, and a way to stick it all to the tank. Beyond that, there are variations of inflator mechanisms (inflator/deflator vs. safe second stage) and weight integration, plus padding.
Since the backplate/wing setup is essentially modular, it can be (a) customized, and (b) taken apart. An aluminum backplate typically weighs less than 2 pounds. A travel-sized wing adds 3-4. My travel BCD (backplate, wing, etc.) weighs less than 6 pounds. There are lighter options, though not by much.
The major advantage, however, is my system is easily taken apart. My backplate can be packed flush against the front or back of my checked (or carried) bag. It is more or less flat, so it doesn’t matter if I pack it first or last. The bladder or “wing” can be rolled up and stuffed almost anywhere. Same for tank bands. So, instead of a single bulky item requiring lots of dedicated space, my BCD packs around other items, much the same as socks and underwear.
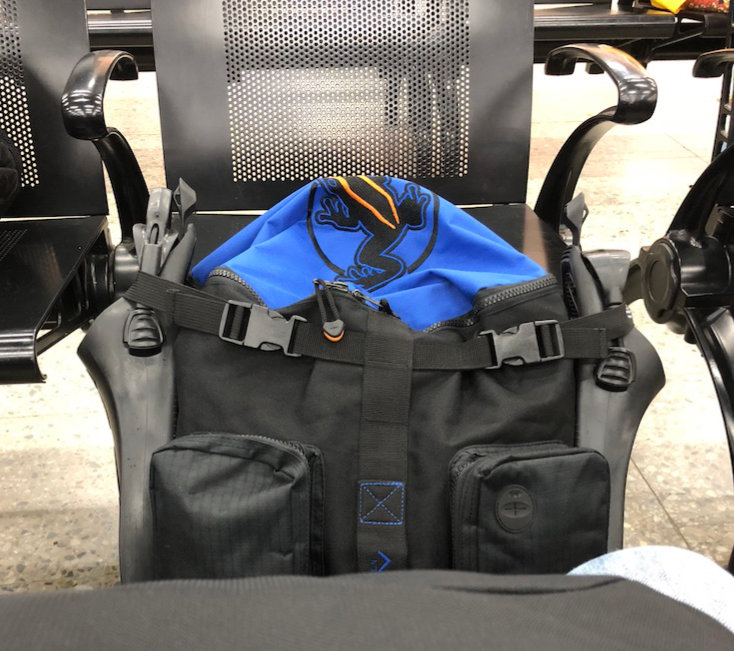
My approach to sidemount is similar, but there’s no backplate, so I can roll it up without taking it apart. The regulator bag pictured below actually contains my entire travel sidemount scuba system, including both regulators and two Shearwater Petrel dive computers!
Choosing Fins For Travel
Fins are probably the second most challenging item for traveling divers. I personally own 6 or 7 pairs of fins (shameful, I know). I’m a total snob about them too. My far and away favorite fin is the Apollo Prestige (discontinued decades ago) and later variant from Dive Rite. But, they are big fins with long blades.
After my last trip to Maui, I had an epiphany. I was unpacking my big, red Fathom dive bag from the 80’s (more about that shortly) and realized the ONLY reason I needed that large bag was to accommodate the length of those fins. Even then, the tips bent a little.
After a little asking around, I discovered the ScubaPro Go Fin. It’s made of monoprene like my other fins, but much smaller. It doesn’t provide the same power that the larger fins do, but I’m not pushing against the drag of a drysuit and other cold-water gear. Besides, diving is like a slow contest for me anyway.
For boat diving, it is perfect, but the Go Fin doesn’t handle a soled boot well (I use a 3mm neoprene “sock”). If you’re doing rough shore entries, going in barefoot is not ideal–especially if there are urchins around. For shore dives, absent major waves, I stick with the Go Fins, but wear Tevas into the water. For the dive, I simply clip them to a d-ring with a bolt snap the same way I carry slates when I’m teaching. Changing footwear is slightly more complex than slipping on and off fins, but not a big deal.
In waves, there isn’t time for that, so I just deal with packing the larger bag and soled boots. Even then, I prefer short ones. Ankle-length booties or slippers are more packable and dry faster than traditional, calf-height diving boots. Some water shoes work well too, and offer good protection from sharp rocks and pokey critters.
Wetsuits and Exposure Protection
I hate being cold. The challenge is wetsuits are bulky, as well as rather heavy. Going from a 3mm wetsuit to 5mm can easily add a couple pounds or more and be much harder to pack. You want the minimum thickness that will keep you comfortable. That seems obvious, but most divers take what they have, rather than what might be best suited for the conditions.
Knowing your personal thermal requirement is key. Compared to all the other travel expenses, owning an additional wetsuit or two is cheap. Keep in mind, the better your wetsuits fits, the warmer it will be. A good fitting 3mm suit will be warmer than a 5mm wetsuit that fits poorly.
I, along with most of the more experienced divers I travel with, tend to take along 5mm wetsuits. Only if space is at a premium will we opt for a thinner suit (the case with my Honduras trip). Not one of us uses Lycra. Although there are a few non-neoprene exposure suits available, I haven’t tried one, so I’d like to hear about your experience with these.
Regulators & Gauges
For regulator(s), go with what you like. It is the first stage that accounts for most of the weight, so less bulky is often better. My primary regulator for recreational diving is an Apeks XTX50, but very often, I need to travel with sidemount equipment as well as back-mount gear. (Sometimes, I need to take complete back-mount, technical systems with deco regs, etc., but that’s a topic for different post.) Rather than carry 3 regulators (1 for recreational dives + 2 for sidemount), I now travel with my two matching sidemount regulators, plus a few tools and extra hoses to reconfigure one of them for back mount dives.
Most divers only carry one regulator, but you can still shave weight by making good choices. In general, first stages with rotating turrets are heavier than those without them. When selecting your first stage check the port locations for hose routing. Choose a first stage with port locations that match your configuration. Most regs will have 2 low pressure, plus one high pressure port on each side. In warm water with an octopus, you’ll need three low pressure ports (2 on the right for second stages, plus one left for your inflator). If you use a safe second stage, you only need LP port one on each side, since the left port feeds both the inflator and your alternate.
Other Dive Gear
For most divers, all that’s left is a mask and snorkel, plus small items like lights, action cameras, spare batteries/chargers, line cutters, etc. I like to pack these into small zippered pouches, using ziplock bags to keep parts and small items organized.
Weigh Everything

This seems obvious, but dive gear always manages to bump up against the 50 pound limit for checked bags. Of course, packing lighter, smaller gear is key, but you can eliminate the guesswork before you even start packing.
My solution was to create a spreadsheet and spend some quality time with my luggage scale. It may seem ridiculous to weigh your underwear, but on dive trips, the last thing many of us (me anyway) think about is clothes. This way, I can pack my bags “virtually” and use the spreadsheet as a checklist to make sure I don’t forget anything.
The screenshot to the right is a simplified version of my spreadsheet. Notice the “Which Bag?” column. It’s a drop-down menu made possible by Apple’s Numbers program. Excel doesn’t have that function, but you can match text and use the same formulas.
At the bottom, weights are calculated for each bag, including your personal item–plus the weight of each bag by itself. I’ve included baggage limits. These can be the limits imposed by airlines, or the maximums you can comfortably carry. Finally, the amount over or under is shown for each bag. Using this tool, it is easy to play with various packing scenarios until you get it just right. Feel free to email me if you’d like the file.
Make the most out of your carry on bag
I see a lot of divers jam all their dive gear into a single checked gear bag, while everything else gets packed like any other vacation. Most often, this results in one dive massively heavy bag, plus an additional checked bag you can probably do without. Assess what you can reasonably (and legally) carry with you on the plane. Most likely that’s going to be around 30 pounds, shaped to fit in the overhead compartment.
I am very strategic about how I use my carry on space. As mentioned, I prioritize delicate and irreplaceable items. Next, I carefully consider shape and weight. This is where the “modular” nature of my buoyancy control systems is a huge advantage. Soft parts like buoyancy cells (wings) and webbing can roll up and fit almost anywhere. I often use my backplate for additional protection of more sensitive equipment. Think about weight distribution and decide what will go where before stuffing it into a bag.
The best diving luggage
In the old days, I lugged around a typical (for the time) diving equipment gear bag made by Fathom. It had one big compartment, with outside pockets for fins, regulator and other gear. It could be carried as a backpack or by the handles. Eventually, though, similar bags came out that have wheels. Stahlsac made the coolest one at the time. Wheels are great, BUT wheeled bags can be heavy. My old Stahlsac bag weighs over 12 pounds! That makes your 50 pound baggage limit a 37 pound equipment limit.
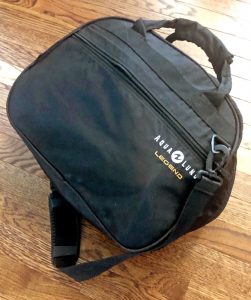
As a result, I went back to my old Fathom gear bag until about a month ago when I discovered the Akona Globtrotter dive bag picture at the top of this page. In my opinion, it is the perfect carry-on for divers. Since, my gear packs down so small, I can do a week long dive trip without checking a bag at all. At first, I wasn’t too sure about strapping my fins to the outside, but it works remarkably well.
In practice, I almost always need bulky camera equipment and gear for deeper dives, so I can’t get away with just a carry-on.
Ideally, you want a light roller bag and a backpack, plus a reasonably roomy “personal item” to place under your seat. It usually makes sense for your heavier checked bag to be the one with wheels, but for reasons I just mentioned, that can work against you.
Packing your dive gear
Aside from BC, wetsuit and regulators, most everything else in your dive bag will be light and relatively compact. The exception is specialty equipment like cameras, housings and strobes. These can be a major challenge. My solution depends on the trip.
Usually, all of my camera equipment and primary scuba gear ride with me. To pull that off, I forget about Pelican cases and use t-shirts, etc. for padding. I also shop Home Depot for small zippered tool bags like these and these. Eliminating loose parts makes things easier to pack, as well as easier to find. It also minimizes the risk of damage from equipment rolling around during rough handling.
Packing tip: Pack a small, lightweight duffel bag that you can put delicate items like cameras and lens ports into. That way, if you are forced to gate check your carry-on bag, you’ll be able to keep your most fragile valuables at your feet. Personally, I just pack all of my cameras and glass lens ports into a smaller duffel. That way, I’m already prepared and can just pull that bag out of the larger one if I need to. Since I use my clothes for padding, I have a clean shirt or two with me as well.
As mentioned, packing for dive trips is an exercise in planning and weight distribution. Sometimes, however, you simply have to cut.
Knowing what to leave behind
These days, most of my dive trips are for some kind of assignment. I’m either writing, working under a marketing contract, or teaching. Writing assignments and marketing projects both require high-end images, so I start with camera equipment and work from there. If I’m teaching, it’s generally a technical diving course, so I pack around multiple regulators, higher capacity wing, plate etc.
I’d love to be able to take all my equipment to all corners of the globe. It just isn’t realistic. I prioritize based on must-haves, nice-to-haves, and just-feel-like-taking items. When space becomes a priority, it’s obvious what to leave behind. For me, that often means clothes. I’m not proud of washing underwear in the sink and wearing the same t-shirt 3 days in a row, but you do what you have to do.
For the average diver, choices usually come down to balancing dive gear with non-dive gear (clothes, laptops…). That’s up to the individual, but the key is choosing the right dive gear for travel. Of course, you can eliminate the entire hassle by renting, but who’d want to do that?
I’d love to know about your perfect travel dive gear set up. Tell me about it the comments…